
 While screw-retained implant crowns are favored today, certain clinical situations dictate cemented crowns on custom abutments. I won’t be going into the different scenarios that favor screw-retained over cemented. Nor will this article cover the advantages and disadvantages of each approach. I’ll assume you already know that… Or, you simply have your own preferences.
I prefer screw-retained whenever possible. But, sometimes it’s not possible or practical.
This article describes a way to document where the screw access in the abutment is relative to the cemented crown restoration for future reference if needed.
Patient’s got a screw loose?
Implant screws sometimes come loose. Fortunately, I have seen none of mine… yet. But, it could happen to any of us, eh? I’ve had plenty of cemented implant crowns show up in my practice with a loose screw. It’s a vexing issue. There are typically two options:
- Cut off the crown and start over with a new restoration.
- Cut a channel through the crown to the screw access and remove the abutment and crown as a single unit… to save the restoration. Place a new screw, torque, and restore the new access with composite.
Where’s the ****ing screw?
This patient presented with a loose implant crown (due to the abutment screw being loose). Not mine. Can we access the screw from the lingual? Maybe. Maybe not. Often not with anterior cases. Is it worth a shot? Or just cut off the crown? (Spoiler alert: I was able to find the screw and access it from the lingual – close to the incisal edge. Got lucky!)
When trying option #2 with another dentist’s work, the reality is that you don’t know where the screw access is located. And, if it’s your work, but you didn’t document where the screw access is… You’re blind, as well. Unless you’re Dr. Rain Man with an eidetic memory, and you have time before Wapner comes on at 4:00.
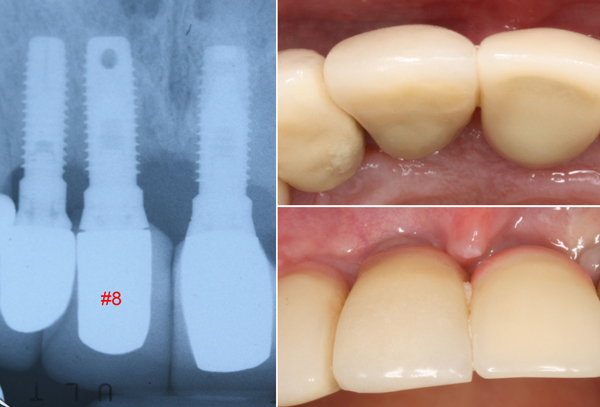
You’ve got the x-ray, of course. But, that’s 2-dimensional. You’ve also got your eyeballs, and maybe you can visualize the angulation of the implant. Hopefully, between the x-ray and your eyeballs, you can deduce where the screw access might be.
Random implant x-ray. But, would you be able to tell where the screw access is from this image? Of course not.
I’ve been very lucky and managed to “guess” correctly many times. Of course, I advise the patient this is a “Hail Mary” and I may end up destroying the crown in the process. So, far that hasn’t happened.
I will say that if you decide to attempt to access the screw through an existing crown, be ready to work hard. Be ready with a new screw. Be ready to charge a fee commensurate with the effort. Be a good guesser, too!
Not MY cases!
So, assuming that it’s possible for even one of MY cases to come loose, is there a way to document where that damned hole is under the crown for future reference? Why, of course there is! Ready?
It’s quite simple, really. It’s a matter of taking two photos of the case on the model before you deliver it. The key is to take the photos from the same distance and angle. Ideally, this would be done with a tripod camera mount and some sort of vise or clamp to hold the model steady.
In this recent case (last week), I just had my assistant hold the model on the table, so it wouldn’t move.
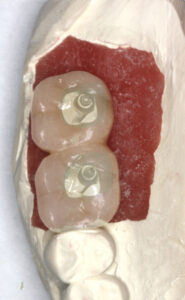
First, take a photo of the abutments on the model straight on from the occlusal.
Then, without moving the model or moving myself or the camera, I have my assistant drop the crown(s) on to the abutment(s). Then take another photo.
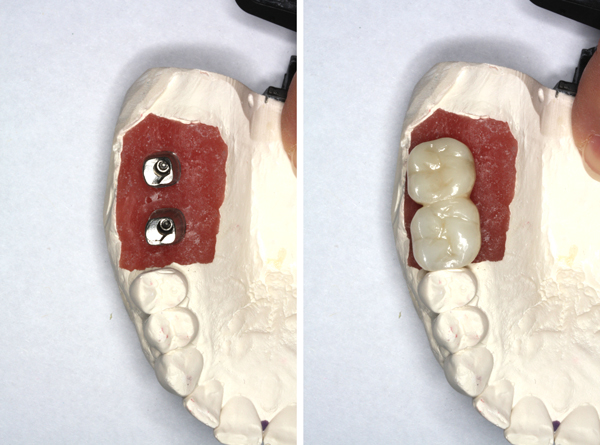
Now comes the magic, courtesy of Photoshop. I’m sure it could be done in other photo editing software, as well. I super-impose one photo over the other and adjust the transparency.

How cool is that? So, how do we actually do it? See video below!
https://youtu.be/wA2m0VXIzKY
If you have a different photo editing software, you should be able to figure it out based on this technique. Wouldn’t it be nice to have this as a reference, should it be needed?
Consider that it’s possible your patient may eventually see another dentist. I’ve heard it happens! And, just maybe a screw from one of your cemented cases will come loose years later. Print a copy and give it to your patient for “safe keeping.”
What do you think? Is this something you’d find useful? Comment below!
(Edit to add:) If you carefully compose the two photos (same angle and distance), you could probably just stack the prints and hold them up to the light! Low-tech! 😀
Nice tip Mike. Thanks for sharing. I have been asking the lab to place a tiny bit of stain where the access is located. This of course only works with posterior teeth.
Thanks again
Maybe they could put some tiny text that reads “drill here!” 😉 Or just an “X” (marks the spot)!
But, then some patient will say, “What’s this ‘X’ on my tooth for?” 😀
Thanks for reading and commenting!
Very cool tip! Thanks for sharing your technique and experience. Appreciated.
Thanks for visiting my blog and commenting, Mika!
I enjoy sharing tips. I cannot claim originality for this one. I saw it SOMEwhere. I don’t remember where, as it was years ago. But, someone did it before me. I’m just trying to spread the word. 🙂
Great tip! Thanks for sharing.
Hi Ken! Thanks for visiting and commenting. I figure if a tip helps ONE dentist, it’s worth posting. 😀
In the scenario where the work was done by another dentist, a very easy way to determine the screw location is to take a CBCT. You can then digitally place an implant in the same location, quickly design and print a guide, and voila.
Some might think it a bit of a workaround, but much better than wasting time guessing in my opinion.
Also if the CBCT shows the screw access will be on the facial in the case of an anterior crown, you can discuss a new restoration with the patient right away.
Haha… well, if I was PLACING implants, I might see a reason to spend $160k on a CBCT in my office. But, I don’t, sooooo….
But, yes… a good idea if you already have one. 🙂
So far… knocking on wood… my SWAG (swinging wild ass guess) has worked for me 100% of the time. SO FAR! LOL! I always inform the patient that this is a “Hail Mary,” and a new restoration may be required.
Question is… why do we see these loose screws? Are that many dentists NOT using a torque wrench? Other reasons? Honest question.
There are lots of reasons for screw loosening – position of implant, implant connection design, occlusal forces, prosthesis type, etc. Anecdotally, I don’t see a ton of screw loosening, and when I do it’s usually an occlusal issue or a single crown on a poorly positioned fixture.
Also, a good all-around CBCT can be purchased for WAY less than what you have suggested. I purchased mine for $65K and that was about 5 years ago. Still not chump change, but no where near the six figure price that used to be the norm back in the day. Of course, deciding to make any equipment purchase must fit the needs of the office, as you mentioned.