There are a number of ways you can use Golden Proportion to plan or present an anterior cosmetic case:
- You could just print a photo of a retracted view of the anterior teeth and draw on it directly with a white “Sharpie” marker.
- You could purchase one of the apps out there (actually, I think they are an annual subscription).
- Or you could do this… Use a template and Photoshop (or similar photo editing software). That’s what I did.
The reasons to do this might include:
- Show a patient the degree of occlusal / incisal wear.
- Show patients what is possible with restorative cosmetic dentistry.
- To help you (the dentist) plan a case virtually.
I have found this simple demonstration very effective with patient case presentations. Here are a couple of examples. I’ll attach a “how to” video below.
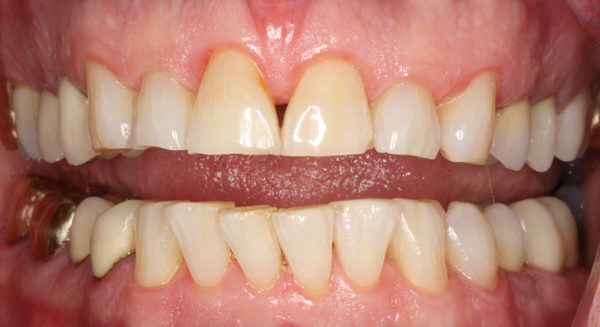
Retracted anterior view. There is significant anterior wear.
Here is the photo I printed to show the patient:
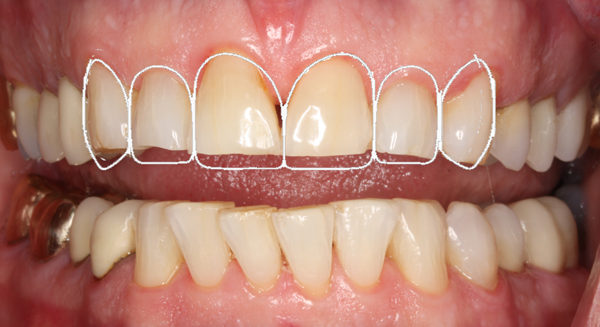
Golden Proportion template added. This helped the patient visualize the amount of incisal wear and how it could be restored.
Another example:
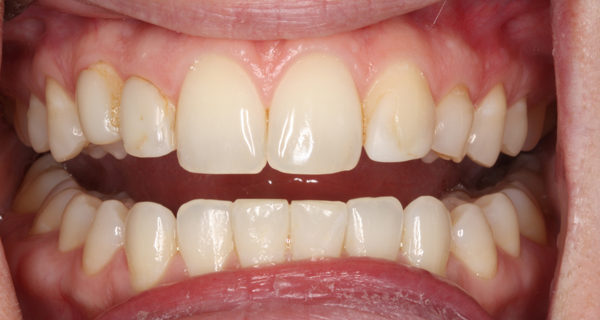
A very challenging case. #7 is a peg lateral. #10 is actually a #11 (mesialized canine and missing #10). #11 is actually a #H (deciduous canine). Each had some composite bonding applied many years ago, which has stained.
Here’s the Golden Proportion overlaid:
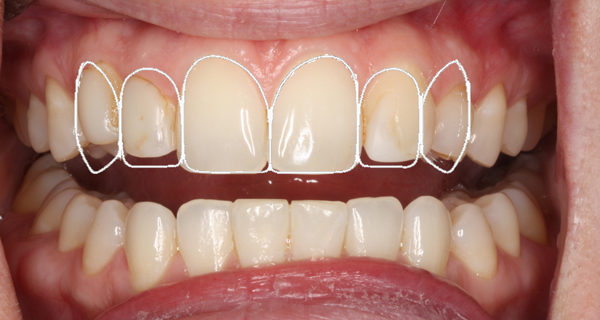
From this photo, we may be able to visualize how the restorations may be designed, where we need to prep (or not), and gingival surgery that may be needed.
So… how did I do it? I made this video today rather quickly. I’m not an expert video producer, so you get what you pay for! 😉
Click here to download the “.psd” (Photoshop file) of the template.
I hope that helps someone out there!
 Copyright protected by Digiprove © 2019 The Dental Warrior®
Great video mike. Where would I obtain the golden proportions template file?
Thanks
There is a link at the end of the article. I forgot to add it initially. It’s there now. 🙂
Hi Dr,
Could you please give me the details how can I get the golden proportion psd ( photoshop file ) as my attempt has failed. Thank you in advance.
You should be able to just click on the link. A new tab or window will open with a pop-up:
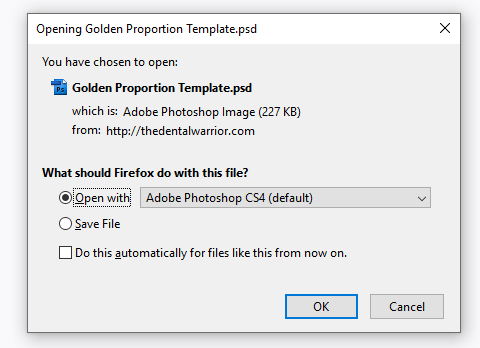
Check “Save File” and click “OK.”
I’ve tested it, and it works for me. If that doesn’t work, post your email, and I’ll send it to you. 🙂
Awesome, thanks!
Many thanks for the golden proportion template. It is really very helpful.
Thank you Doctor .