 To say dentists don’t get much glory in the popular media is a massive understatement. Rather, we get the opposite of glory. There have been dozens of TV shows and movies glamorizing the medical profession. In the off-chance a dentist is portrayed at all in pop culture, it’s usually as a bumbling fool who is socially awkward and lacks any semblance of self-esteem. There’s even a persistent urban legend that we have the highest suicide rate.
Plastic surgeons get a lot of credit for changing lives. Dentists? Not so much. The funny thing is that a smile makeover can have a far more dramatic impact on appearance than rhinoplasty, blepharoplasty, or even full face lifts – all of which are VERY invasive and involve significant risks. A smile makeover or full mouth rehab is not nearly as invasive or risky. But, the results can be stunning.
I’ve done many cosmetic / rehab cases over the years. And, in this current economy, they’ve been more scarce. But, when I do get to do them, I still find them so professionally rewarding. The ability to have such a deep impact on the quality of someone’s life… as a dentist… Well, that’s just COOL!
Dad’s teeth are in trouble.
Over the course of the past several years, my dad and I have talked about fixing his teeth. He has a history of gastric reflux (now medicated) along with a dash of bruxism. The result has been the utter destruction of his teeth. He also has a deep anterior overbite. Like many people, he wasn’t too excited at the prospect of a full mouth reconstruction. So, he put it off… and put it off… until he couldn’t. The upper anterior teeth were eggshell-thin and breaking down. He also told me that he hasn’t been able to look in the mirror at his teeth out of shame and just plain revulsion. He literally would not look at his own teeth.
 Even though I offered to refer my dad to a respected prosthodontist about an hour from where he lives in Arkansas (yes… they have dentists there!), he insisted on traveling to see me. Fortunately, at his last visit, I did make mounted study models. So, I sent them off to Gold Dust Dental Lab in Arizona for a full diagnostic wax-up “kit.” Kit? Yep! What they send back is more than just the wax-up. It’s an entire “kit” that nearly blue-prints the process of prepping the teeth and making provisionals.
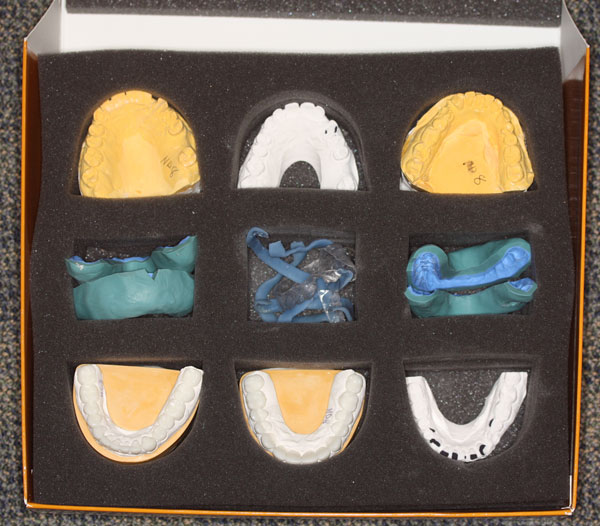
This is how the Gold Dust “wax-up kit” arrives. Actually… not exactly. This is my attempt to re-pack it after unboxing it all and removing the bubble-wrap. They do a much better job of packing it!
Included in the kit are Sil-tec impressions of the wax-up for making provisionals. There are two types of reduction guides, including a clear matrix along with facial and lingual reduction indexes. These guides really make the prep appointment more efficient and more precise. We’ll take a closer look at the wax-up later.
OK… let’s take a look at my dad’s case.

Pre-op smile.

Pre-op retracted open and closed.
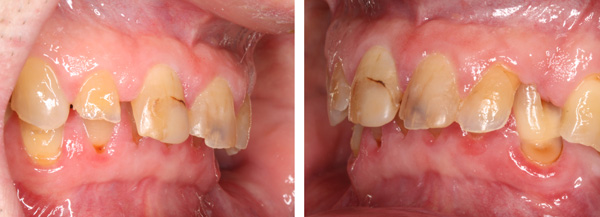
Retracted left and right, in occlusion. That lower left canine is occluding with the tissue in the monster diastema between the upper canine and lateral!
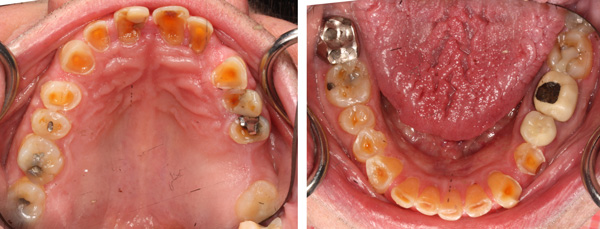
Occlusal views, pre-op.
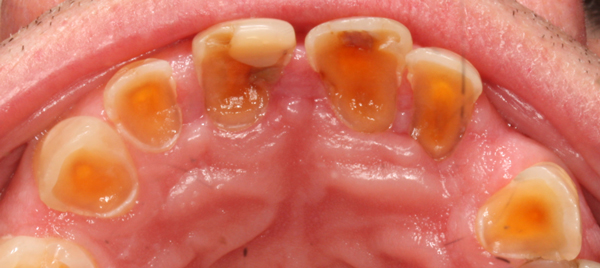
Let’s take a closer look at the erosion of the upper anteriors. Hey! I can see my pulp chamber from here!
Holy cow, eh??? Where to start? Dad’s dentition was the equivalent of running on four bald tires, and the only solution was a whole new set of tires. But, we can’t go in there and start prepping willy-nilly without knowing the final destination, right? So, off to the lab the case goes for a full diagnostic wax-up!

Mounted pre-op models.
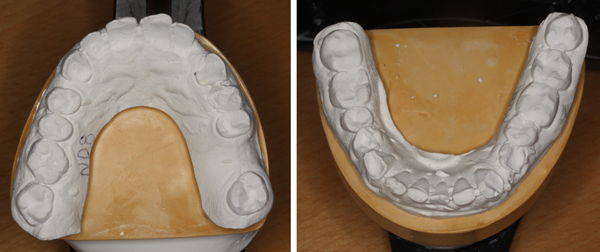
Occlusal views of pre-op models.

Wax-up!
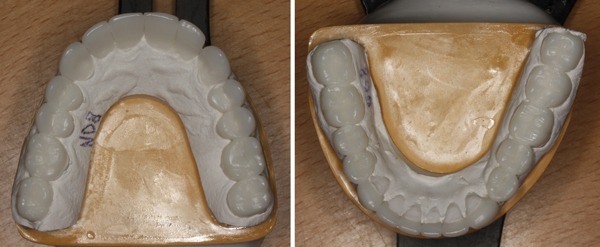
Occlusal view of wax-up.
Dad and I made a date, and my schedule was cleared.
Day 1
The first appointment was for root canals on 5 teeth (#s 7 – 10 and #12). Did them all in one appointment. And, that was enough for that day.
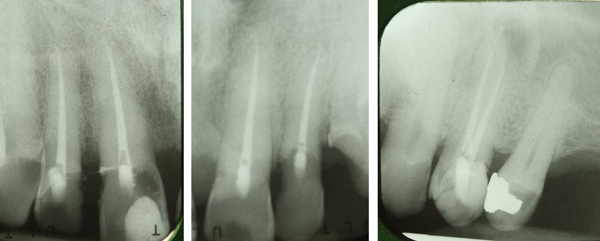
Root canal treatment #7, 8, 9, 10 done in anticipation of needing posts for restorative purposes. Treatment of #12 was for an apical abscess.
Day 2
The next day, I prepped and temped the lower anterior ten teeth (#s 20 – 29). I used the Sil-tec matrix provided by Gold Dust to help me avoid over-reducing the teeth. I loaded it with Luxatemp and seated it (without any bonding agent). This gave me “ideal” teeth to prep. As you’ll see, the incisal reduction was pretty much done for me courtesy of Dad’s acid erosion and attrition.

Luxatemp over unprepared teeth.

I still use depth cuts when I prep. I find the “connect-the-dots” approach leads to more uniform reduction.
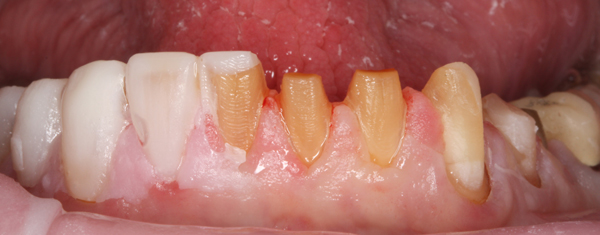
Continuing the preps. After doing an ideal incisal reduction of the “Luxatemped” teeth, I ended up right back where Dad had worn them down.
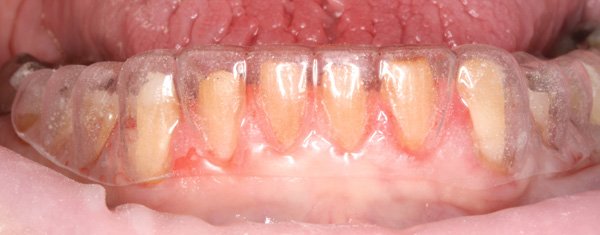
Using the clear stent to visualize wax-up over preps.
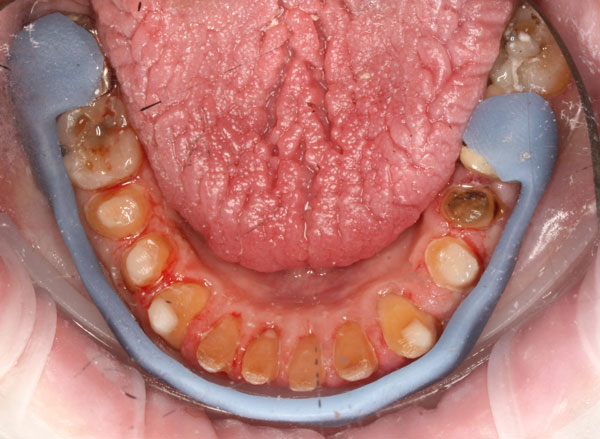
Facial reduction guide. These are made with “Triad.” Note that at this point I needed to go back and reduce the facial of #22 further.
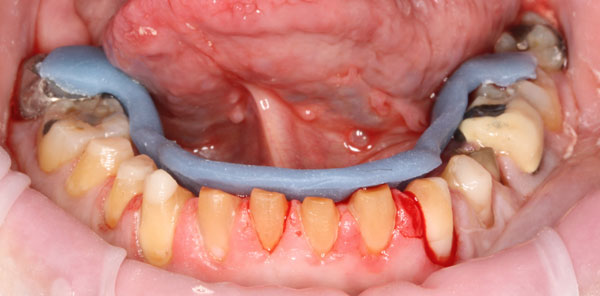
Lingual prep guide. Note that #23 and #25 need a bit more on the lingual.
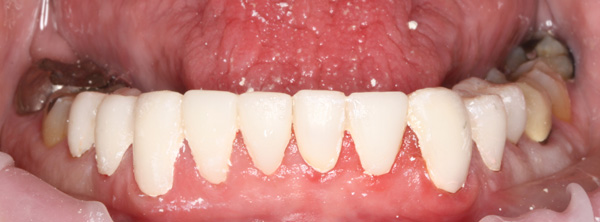
Lower provisionals.
Day 2 continued
Next, I placed posts where I had previously done root canal therapy in order to provide retention for the build-ups.
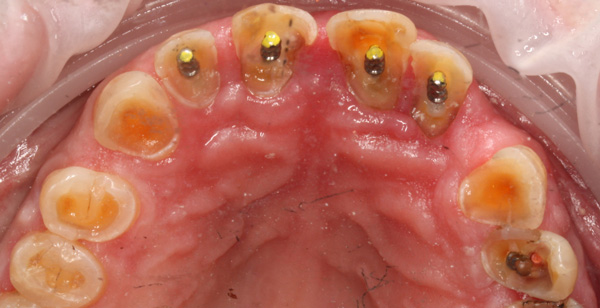
Posts placed in 7 – 10 at this point. Post placed in #12 after photo.
I cleaned up any decay and removed old restoratons on the upper front ten teeth. Then, instead of doing the Luxatemp trick I did on the lowers, I used Pentron’s Build-it FR composite build-up material loaded into the Sil-tec impression of the wax-up. It was bonded with 3M’s Scotchbond Universal.
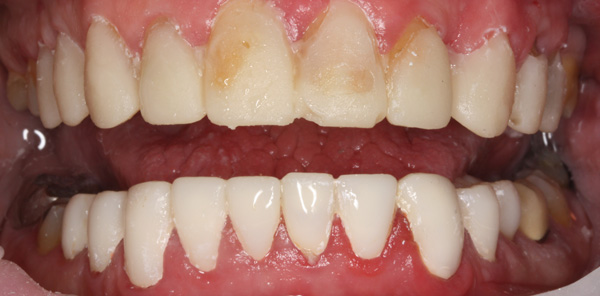
Upper arch built up with bonded composite placed in the Sil-tec matrix of the wax-up.
At this point, Dad was still up for more, and I was still feeling ambitious. So I started prepping the upper anteriors. But, after four preps (7 – 10), I was spent, and so was Dad. I made provisionals for those teeth using the same Sil-tec matrix. And, we called it a day.
Day 3

The next day’s smile (not numb) after upper front four were prepped. Canines back are still build-ups.
On Day 3, I prepped the rest of the upper arch and made provisionals. Again, I used all the guides provided by Gold Dust dental lab to help me prep and give them adequate room for porcelain.
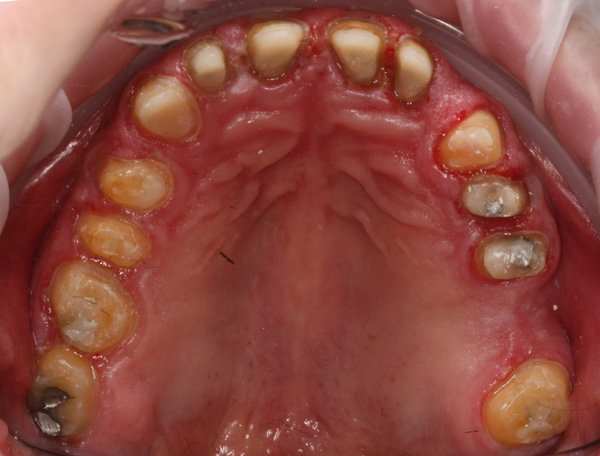
Upper arch prepped.
I was pretty beat at this point, and so was Dad. I didn’t want to make the impressions while I was that fatigued. I made provisionals and called it a day.
Day 4
On Day 4, I removed the upper provisionals and reviewed my preps. I touched them up and then used my Picasso Lite diode laser for gingival retraction. I took two Impregum impressions for good measure (plus I didn’t like the margin on one tooth). Then I took a facebow record. I made a “sequential” bite registration by placing the anterior segment of the provisionals on #7 – 10 and squirting Blu Mousse on the posteriors. Then I removed the anterior provisionals and filled in the blank with more Blu Mousse. After that, I had my dad stand up and added a “stick” to the anterior area of the bite registration, leveling it parallel to the floor / horizon.
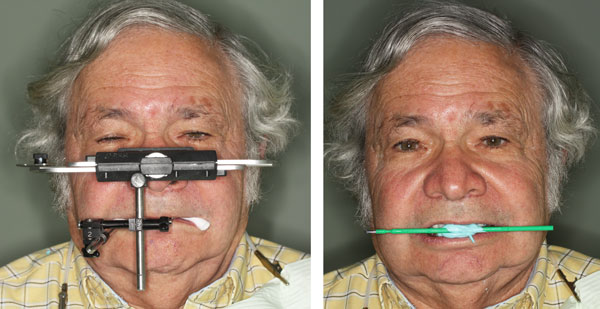
At this point in the LONG appointment, the fatigue is comically evident in the patient’s face. Dad’s TIRED! But, if I had turned the camera on myself, the expression on my face would be similar! The more information I send to the lab, the better (and that includes these photos).
After cementing the provisionals with Tempbond, we made impressions of the upper and lower arches and another “stick bite.” We also discussed the shade of the final restorations. I wrongly predicted that he would go more “natural.” Dad has decided to go “white.” Really white. We also discussed incisal translucency and surface texture.
Some photos of Day 4:

Upper preps – front view.
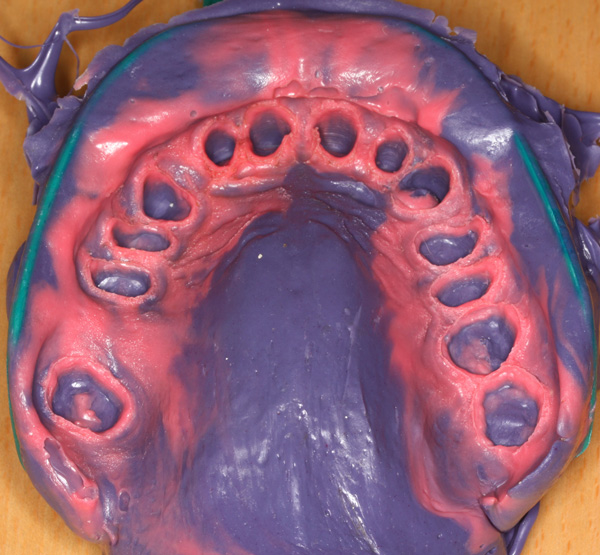
One of 2 final impressions.
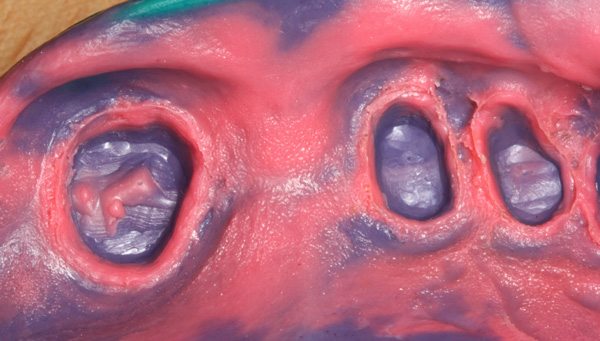
Closer detail of final impression.
Dad was a real “trooper” during four straight days of intense dental treatment. It was a butt-kicker for both of us!
The day after Day 4, I took a facial photo of Dad. I have to admit it was strange to see Dad with teeth that showed. He was very happy, though! As many times as I’ve done this type of treatment, I’m still amazed at the way a dental reconstruction can alter the face. My dad looks thinner, as his face is now longer.
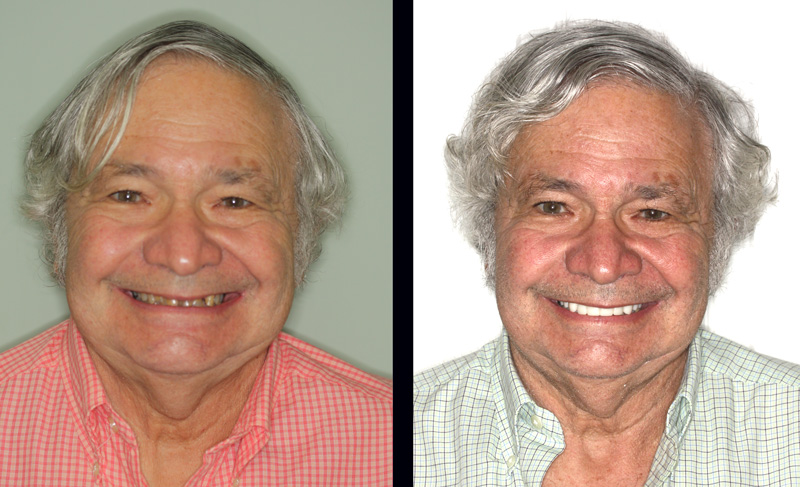
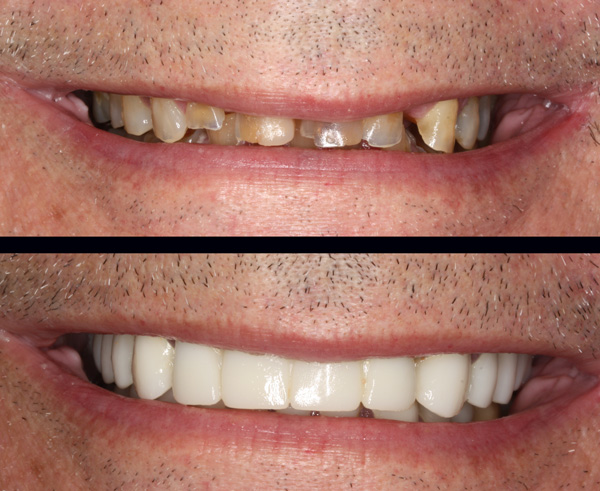
OK, that’s it for now! The case is off to the lab along with all the pertinent photos burned onto a CD. Dad went home. He called and told me my stepmother was flirting with him! Everything feels great. During his next visit, we’ll deliver the upper restorations and then finish prepping the lower arch. At the third visit, we’ll deliver the lower arch restorations.
UPDATE: Click here to see the finished case!
Feel free to comment below!
 Copyright protected by Digiprove © 2013 The Dental Warrior®
Awesome Mike. I am proud of you! Its got to feel great doing that for your Dad.
Looks amazing, Mike!! Now we can tell where you get your good looks!!
Beautiful work!!
Nicely Done! It is a great feeling to do something like this for family.
Awesome, awesome work Mike! That is what dentistry is all about and the reason most of us went into it. This was a lifetime and life-changing opportunity for your dad and for you!
I learned a lot of tricks too…thanks for the education!
You make it sound so straight forward. As a relatively new dentist, I’ve always thought of full mouth reconstruction as out of my comfort zone. Do you have any suggestions of where to start?
Hi Kate,
In a way it IS “straightforward.” Always fall back on the basics. “From the ground up.”
Naturally, the first thing to do is eliminate any pathology (perio, endo, caries, etc.)
Occlusion is also very important, of course. To borrow from Stephen Covey’s famous book (The 7 Habits of Highly Effective People): “Begin with the end in mind.” Know where you want to end up. Diagnostic wax-ups are critical. Stay in control of the case (and do it in phases if needed).
Esthetics are also important. Again… begin with the end in mind. Where do the upper centrals need to be? That’s a good place to start, and build from there. Esthetics and phonetics are key parts of that.
My career changed when I took a course by Larry Rosenthal on Smile Design. It was a hands-on course where we did veneer cases on our own patients. About a year later, I took the Advanced Smile Design course. About a year after that, I was asked to be a clinical instructor for his course (and did that a few times).
I also took a series of courses at the Dawson Center on occlusion.
Over the years, I’ve averaged about 100 hours of CE per year. I think that’s the key. Never stop learning. I spent all day today in a course on implant restorations. 🙂
Good luck!
Great job! It must be very rewarding to create a beautiful smile for someone who was hiding it before. To preserve his new dentition, will you send him home with a night gaurd? Also, please be sure he has adequate hygiene instruction and home care (Water Pik). I’m hoping that’s part of the treatment plan so that you don’t have to re-do any of this great work.
p.s. I love your web site!!
Kate, you may want to check out a program by Dr. John Nosti… it’s a 4 day, 2 weekend over-the-shoulder Full Mouth Rehab program. It has gotten terrific feedback from clinicians looking to observe a real time rehab. You can find info at http://www.clinicalmastery.com …
Excellent suggestion! 🙂
Wow, Mike. Amazing. And, your Dad is a TROOPER.
Yes. He was a trooper!
Awesome job Mike…
Great case Mike, can’t wait to see final product on your father. One question though if I may regarding wax-ups in your daily practice ; Mike obviously the wax up is critical to clinical aspects of any such case and needed for anyone coming in considering doing such a rehab, but do you also use it as a selling point or do you pretty much have the case sold by then and the wax-up is just the next step? I know some suggest doing wax-ups to sell/promote more such cases and then crediting the cost towards the total case as some sort of incentive for the patient to move forward. What are your thoughts on that? I guess what I am asking is how much of a role does the wax-up play in helping patients move forward with treatment or is it a foregone conclusion by wax-up time?
Thanks,
Ken
That’s a great question, Ken. To be honest, I’ve never used a wax-up to “sell” or educate a patient. My most successful tool in that regard has been photos of other cases I’ve done (preferably cases similar to that patient’s). I believe that photos of YOUR actual cases are the most powerful proof of competence you can offer.
I always enjoy reading your posts and blogs but this one with your dad is hands-down my favorite. I wanted to cry happy years just looking at his new beaming smile! Way to go.
Thanks, Beverly! I’ve worked hard to develop my skills. But, it was extra-special being able to put them to good use for my dad.
Extremely challenging case done extremely well!
WOW! I can’t wait to see the final results!! His self esteem is up 100% I’m sure!! Looks great!
Awesome Job Mike! what a difference pre-op to temp. I cant wait to see the final restorations. He’s going to look even more amazing. Great working with you!
Thanks, Jim! I’ve been VERY impressed with your work! Makes my job that much easier, too. 😀
WOW !!Mike . What a fantastic blog. Good job ,nice work …
Hi mike, your work is superb.
Just a question, did you use Empress for crowns or any other choice material?
Go on, you are helping me a lot with your tips and tricks.
Greetings from Spain!!
Hola Dario!
For my dad, we used Emax crowns.
Gracias por tus comentarios!