
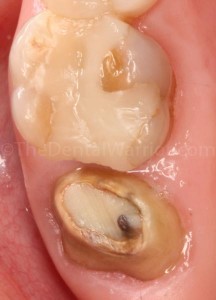
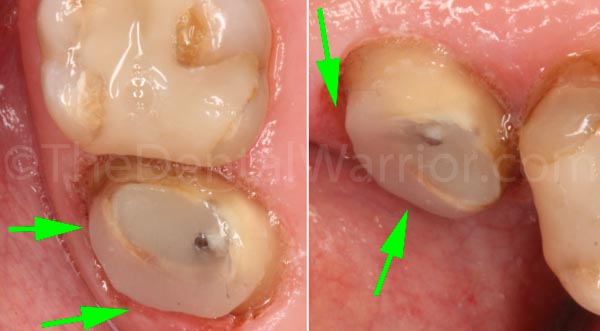
Today’s challenge was a tooth #2 belonging to my former hygienist. An all-ceramic crown fractured in half and debonded. It had been endodontically treated before. The tooth was under-prepped occlusally and over-prepped and over-tapered axially, particularly on the distal. The existing prep had very little retention and resistance form…. really NONE. I couldn’t re-prep it as it was. I needed to recreate some of the lost tooth structure.
Three different views of the prep as it presented pre-operatively. Note the over-prepped axial surfaces.
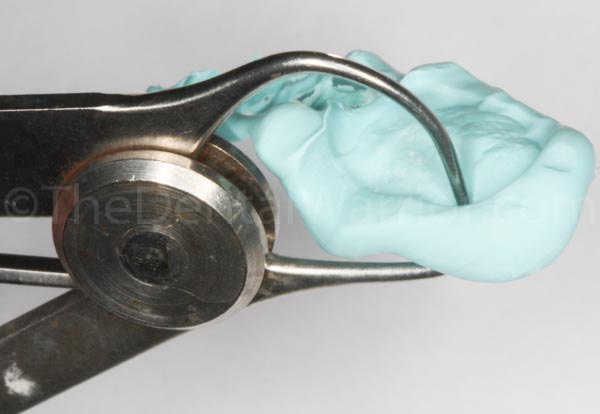
So, I roughened / freshened the axial walls by “dusting” it with a diamond bur and removed a millimeter or two of the core build-up on the occlusal. I couldn’t get a metal Tofflemire band to engage the tooth. There was nothing for it to “grab,” as the tooth was turned into a “teepee” by the previous dentist. The band would just slip off as it was tightened. Then I found some old crown core forms in the back closet. They were made by Pentron. But, they’ve been discontinued! Editing to add: I found a similar product from EDS. Scroll down this EDS webpage page to see the product. But, the webpage lacks a “BUY” button for the core forms. Give them a call to order it.
I etched and bonded with Scotchbond universal. I warmed up some Filtek Bulk composite in hot water and filled both the endo access in the tooth and the crown core-former. Then I “smashed” the composite-filled former over the tooth and used an explorer to remove the extruded excess. Then cured from all sides with a Valo curing light.
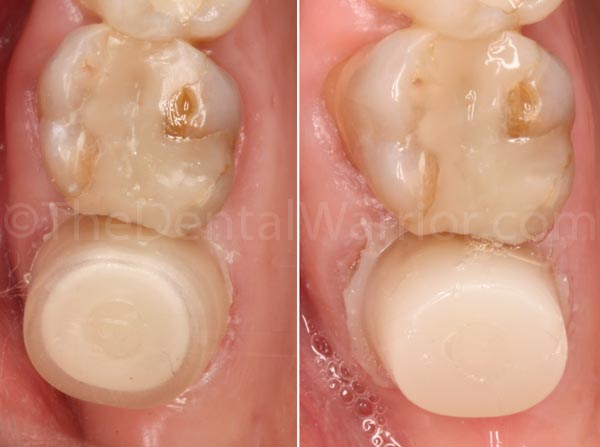
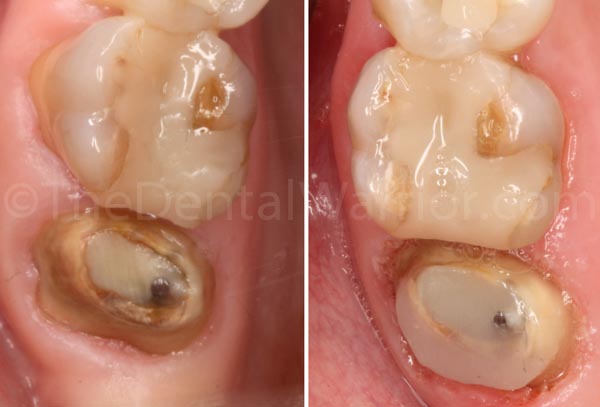
With core-former on left. Core-former removed on right.
When I removed the core-former, I was left with a grossly-overbuilt core. But, at least now I could do what I wanted with it in terms of trying to recreate a prep with better axial parallelism.
I re-prepped the tooth for a new gold crown (instead of ceramic) for two reasons. First, it was opposing a gold crown (#31). Secondly, I could keep the prep more conservative. After prepping, I cured the build-up again with the Valo light.
After prepping, you can see where the composite built up the axial areas that had been previously over-prepped.
Due to the angulation of the teeth, it was hard to visualize if I had enough occlusal reduction. So, I made a Blu-Mousse bite registration and used a caliper to indirectly measure and confirm adequate clearance.
Checking occlusal reduction indirectly.
After I was satisfied with the prep on #2, I used a fine diamond to smooth and square up the distal proximal and marginal ridge of #3. Yeah… that tooth needs a crown, too.
After prepping, we took a final Impregum impression (diode laser retraction) and then an alginate to help me make the temporary (since I didn’t have the original crown to make a pre-op impression. After the alginate impression was made, I took a #8 slow-speed round bur and carved out the alginate to make a negative of the temp crown. Then I used Luxatemp and seated it in the mouth. I had to use a bit of flowable to fill in some blanks and then high-speed flame diamond to free-hand carve it to look somewhat like a tooth.

I considered adding a retentive groove or two to the prep, but the fit of the temp restoration confirmed that I had decent retention and resistance form.
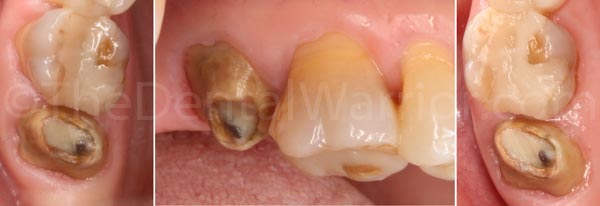
Before (left) and after (right). Apologies for the slightly different angles of view.
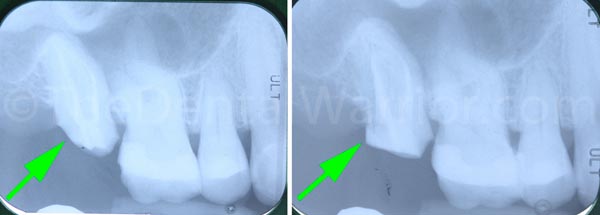
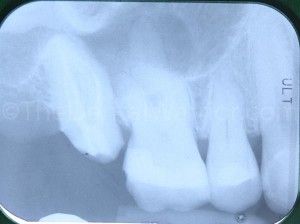
Before and after radiographs. Green arrow to point out the built-up distal axial wall.
While the occlusal reduction appears excessive in the clinical photos and the final x-ray, I can tell you that (by measuring the bite registration), it was only 1 – 1.5 mm. Due to some likely super-eruption of #31, and a steep curve of Spee, there was very little room inter-occlusally.
And, that’s the end of today’s story!
 Copyright protected by Digiprove © 2016 The Dental Warrior®
Now that is using your ultimate skill Dr. Mike. My only question, did you also prep #14?
I’m sure your patient was elated you made a heroic deed to save that molar.
Sorry, #3?
We didn’t prep #3, though I’d recommend crown on that tooth eventually.
I love those core formers, and use them on a regular basis.
Great case and a bit of a reason I am sometimes reluctant to throw things away like old core formers as you just never know sometimes when something like that might just come in handy!
The trick is remembering where you put those oddball supplies! 🙂
Not just a dental warrior, pretty fine cosmetic dentistry as well. 😀 Didn’t thought that those oddball supplies can be utilized to grab those “tepee” tooth. Those axial walls must be softened in order to grab that tooth or maybe prep #3? Nice attack Dr. Mike, for an overprepped tooth.
Great article though….you did nice job..I wonder see this..Thank you..
Nice Article …Its challenge, but you did it gracefully ….
Thank you
I’d like to have a few of these around the office for weird situations like this. Do you know if they are still sold? I’m having trouble finding them. Great post, by the way! Really enjoy reading cases like this. Being a relatively new dentist, it’s great seeing solutions to cases I never saw in school and wasn’t able to come up with such effective, efficient solutions. Keep up the great posts!
Thanks, Jared! I just did a search. They’re made by Pentron. Here they are: http://www.pentron.com/products/product_detail/build_it_core_forms. Whoops! Editing to add… I just saw that the product is discontinued!! Oh no! I’ll search for comparable product and post here if I find it.
OK…. EDS has a similar product. You can find it at the bottom of this webpage (scroll down): http://edsdental.com/ticore.htm
But, there’s no “BUY” button for it. If you go to this page, you can find it under “Composite Accessories.” You’ll have to scroll down a quite a way. http://edsdental.com/product_sku.htm#posts. Probably best to just call them. Their website is a bit lacking in the “user interface” department. 🙂
greatly impressed by technique. will try to share it with my audiences