
I thought I’d do a quick review of a software program I’ve been using to analyze my precision rifle target groups. It’s called “OnTarget.” If you want to skip the “intro” or “review” of what shot group size means and want to get right to the OnTarget shot group calculator software review and demonstration, click here (or scroll down).
How am I doin’?

Click on image for full-size view. This was a 300 yard target with 20 shots. Red bullseye is 3-inches.
A competition or precision target shooter is always interested in measuring his or her performance. Precision shooters are all about the… well… precision (and accuracy) of his shots. We take a “group” of shots and measure them. The tighter the group, the better. A tight group means the shooter (and the gear) are CONSISTENT.
The size of the group is dependent on a number of factors, including the aforementioned consistency of the shooter and gear (rifle, optics, ammunition, etc.). Other factors include the distance from the target and environmental factors, such as: wind, temperature, barometric pressure, altitude, and even humidity.
The BIGGEST variable is the SHOOTER, of course. 😳
But, ultimately, small groups is what jazzes precision shooters. It’s the same satisfaction as a dentist gets from smooth, sealed crown margins! 😎 Precision shooting is right in the “wheelhouse” of dentists! It involves science (and math) and a bit of art!
A “primer” on group measurement…
Shot group size is traditionally expressed as an angle. The shot group is measured in inches (or metric) on the target and then converted into an angular format (the angle formed by two imaginary lines from the borders of the group extending back to the muzzle at the shooting line). So, it’s converted from inches to “MOA” (minute of angle). You may recall that there are 360-degrees in a circle. A “minute of angle” is 1/60th of a degree. There are 60 “minutes” in 1 degree. Roughly, a one-inch spread at 100 yards equals one minute of angle. More precisely, 1.047-inches at 100 yards equals 1-MOA. Since it’s an angle, the linear spread of the angle gets proportionally bigger as distance increases. At 200 yards, a 1-MOA group is roughly 2-inches across. At 300 yards, it’s roughly 3-inches across. So, a 1-inch group at 200 yards would be roughly 1/2-MOA. Make sense?
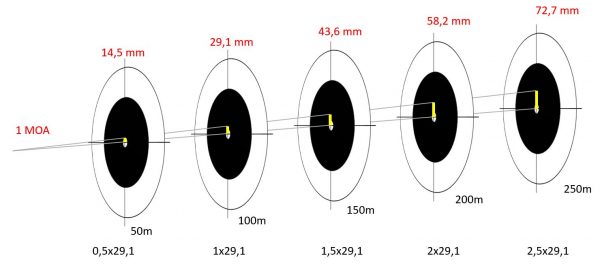
This was the only open-source image I could find online. The measurements are metric (meters and millimeters), but the concept is the same, of course. The same angle (1-MOA or 1/60th of a degree) projects a larger spot or “group” as the distance increases. 1-MOA at 100 meters (109.4 yards) would be a 29.1-mm (1.2-inches) group. At 200 meters (218.7 yards) , it’s a 58.2-mm (2.3-inches) group. Got it?
Perhaps not coincidentally, a 1-MOA shot group is considered the STARTING of “acceptable” precision performance. Precision shooters don’t really start to get excited until their group sizes drop below 1-MOA. So, for example, a 3-inch group at 300 yards (1-MOA) would be, “Meh… pretty good,” to a seasoned precision shooter. But, a 1-inch group at 300 yards would be a rather impressive 1/3-MOA. “Woo-hoo!”  But, each additional fraction below 1-MOA gets increasingly more difficult.
The old school method of calculating group size is by doing the math long-hand. You measure the group size with a ruler or micrometer at the largest dimension, edge-to-edge. From that you subtract the caliber size, to get a “center-to-center” measurement. Then you use this two-step formula:
First, we calculate the equivalent length of 1-MOA at your target’s distance:
(Distance of your target ÷ 100) x 1.047.
So… at 300 yards:
(300 ÷ 100) x 1.047 = 3.141
That means 1-MOA at 300 yards is 3.141-inches.
Second part: Divide the size of your group by the result from step 1.
Let’s say you shot a 1-¾ (1.75) inch group at 300 yards.
1.75 ÷ 3.141 = 0.557
That means a 1-¾ inch group at 300 yards comes to 0.577-MOA. That’s a great group! Good shootin’, Tex! 😎
Let’s apply that to this target.
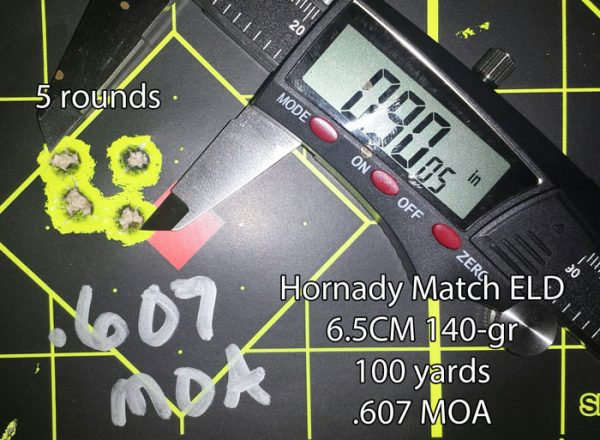
Manually measuring group size: Edge-to-edge of the largest dimension of the group is 0.900-inches. Subtract 0.264-inches for the caliber of the bullet, giving us a center-to-center (CTC) measurement of 0.636-inches.
The distance of this target was 100 yards. So, step 1 is to determine the linear value of 1-MOA at the target distance. Easy in this case, since it’s 100 yards.
(100 ÷ 100) x 1.047 = 1.047
Now for the second part:
Divide the size of the group by the result from step 1.
0.636 (CTC) ÷ 1.047 = 0.607-MOA
Math is hard. There’s an app for that!
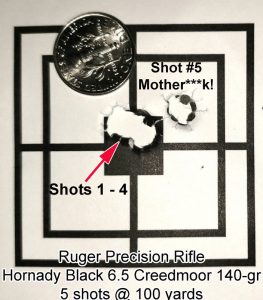
5th shot “flyer” frustration! 🙂
There are online MOA group size calculators like this one. You just plug in the distance and group size, and it will tell you the MOA equivalent. It’s convenient for a quick calculation of a single target. But, if you’re an avid or frequent shooter, you’ll want to be able to efficiently analyze your groups and annotate them in one fell swoop.
There are apps you can put on your phone or computer. Some are free. Some are purchased (for a nominal price). I find the phone-based apps rather tedious and cumbersome, since you have to use your relatively-big fingers to trace bullet holes on a target image on a relatively-small phone screen. I much prefer doing it on a laptop (PC) computer, using a mouse. It’s MUCH easier and MUCH faster… and probably more accurate.
OnTarget Shooting makes it easy!
My favorite group size calculator app is from OnTarget Shooting. I fly through my target group mark-ups with this program! I can calculate five groups (of five shots each) on a target in about 1-2 minutes. At a typical range session, I’ll shoot about six targets, each with four or five groups. So, that’s up to 30 groups. When I get home to “process my target photos,” OnTarget makes it easy! Doing that on a phone app would take foreeeever.
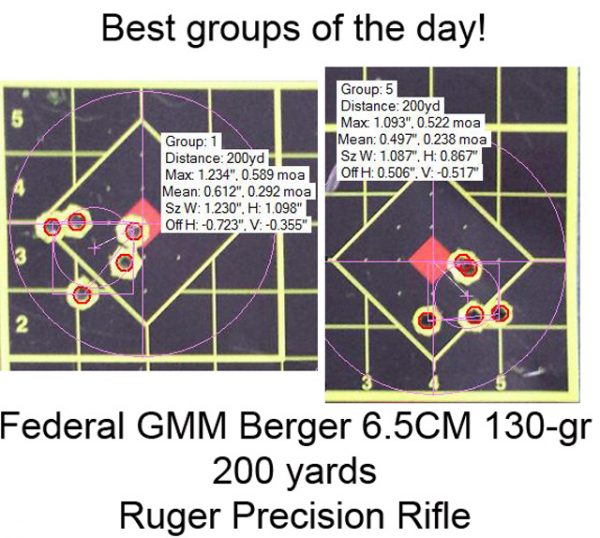
About 1/2-MOA! Not bad!
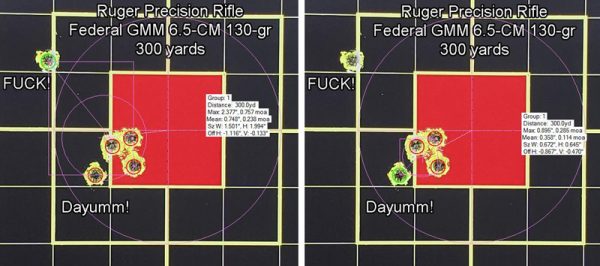
Both images are the same target. They illustrate the frustration of many precision shooters… that pesky “flyer!” So, I measured the group (using OnTarget) with and without the flyer. The grid is 1-inch squares. Even with the flyer, the group is an impressive 0.757-MOA at 300 yards. Without the flyer (a 4-shot group), it’s 0.285-MOA group! Consider that 0.285-MOA converts to 5/1000ths (0.005) of a degree. That means I held the rifle steady to the point of not varying more than 0.005-degrees.
There are two versions of OnTarget: OnTarget PC and OnTarget TDS. Think of the PC version as “lite” and TDS as “pro.” You can compare their respective features here, and decide for yourself which is best for you. I got OnTarget TDS.
How does OnTarget work?
In a nutshell, here’s how it works. You open a photo of your target in OnTarget. You then use the “ruler” tool to measure a known reference (like a 1-inch grid or a 3-inch bullseye on the target, for example). You then select your caliber. Now, it’s time to measure your group(s). Using the “bullet hole” tool, you mark your hits. Then you mark the “point of aim.” Presto! You will see a text box appear with your group size, both in inches and MOA, plus some other data. The data contained in the box can be customized to your preferences. Next, you have the option of saving the target image with the group data superimposed.
Here’s a video I just whipped up. It’s a bit longish (12 minutes), but it covers the basics of how to use OnTarget. It’s worth the watch!
Now you’ve documented your group sizes for future reference. You can use them to analyze which ammo performs best, on average, with your rifle. You can share the target pics with group sizes with your friends. You can look at a history of your images to see how you’ve improved over time.
Advanced stuff!
I’m still learning (a lot) about the science and math of precision shooting. But, here’s another nifty thing you can do with OnTarget.
When evaluating ammo, trying to match the best load to your rifle, the larger the data sample, the better. Right?
Shooting a higher number of rounds in a group is obviously more informative… a 5-round group is more telling than a 3-round group. A 10-round group is even better. The problem can be evaluating the groups with the higher number of rounds due to overlap of the shots. It’s hard to trace your shots with ragged holes. If you’re a decent shooter, at some point, you won’t be able to tell where you last shot impacted, if it it’s going through a larger ragged hole.
The other issue with a big ragged hole is marking the POA (point of aim), as the bullseye has been obliterated. For that matter, while shooting, it’s hard to put your scope cross-hair on the bullseye, if it’s been obliterated by multiple shots.
So, this approach involves shooting 2 – 3 rounds at multiple identical targets. It’s easier to see 2 holes on a single target than to try to distinguish 20 holes on the same target (many of which are likely overlapping). Then use OnTarget TDS app to create a “Virtual Group” or what I like to call a “Composite Group.” It superimposes all the targets, creating a composite.
(This feature is available only on the TDS version of OnTarget.)
For the purposes of this demonstration, I’m going to use simulated targets. This is some cool shit. I made a target with 10 bullseyes. I shot each bullseye with 2 shots. So, a box of 20 rounds, divided up into 10 targets. I intentionally created a few “flyers.” Here’s the target:
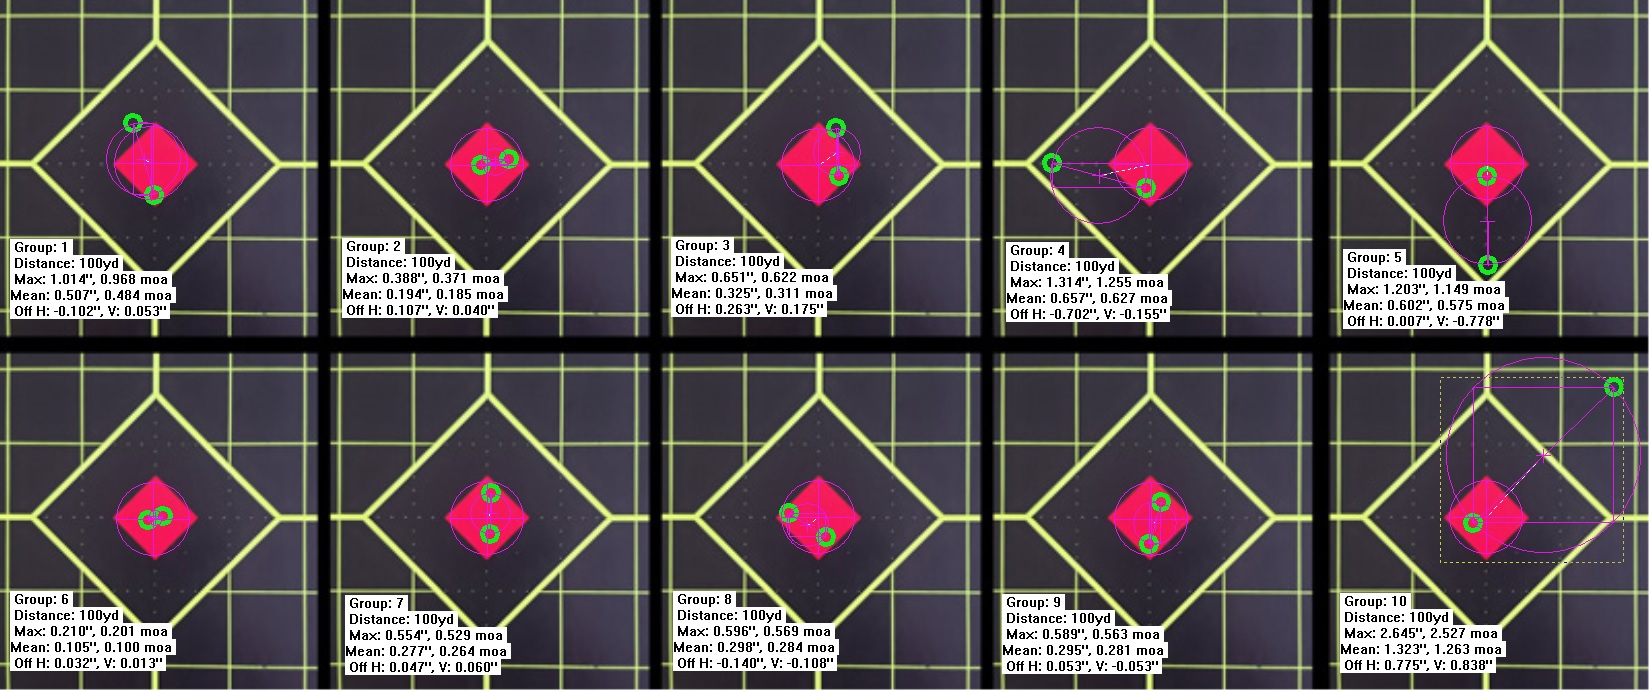
Click on the image to see it full-size.
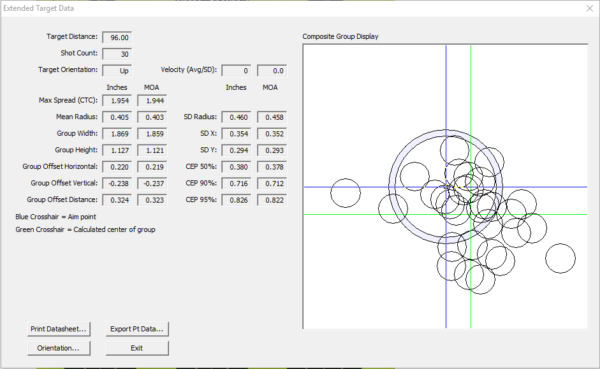
Next, I clicked on the “Show Extended Target Data” button in my OnTarget TDS app. This is what pops up. It’s a composite image of all the groups. How cool is that? All 10 targets stacked on top of each other. To the left is a bunch of data.

Click on the image to see it full-size. Note the intentional simulated “flyers” at 1:00, 6:00, and 9:00.
So, this brings us back to the issue of “flyers” or “outliers.” If we go by the true traditional MOA , the overall group size (3.4-MOA!) is deceptively large and doesn’t really help us determine if this ammo load is a “good one.”
If we look at the data next to the composite image, we can see the more useful Mean Radius is 0.515-inches or 0.491-MOA. You can also see the offset of the group center from the point of aim. I honestly don’t know what ALL of rest of the data is. I’m still learning!
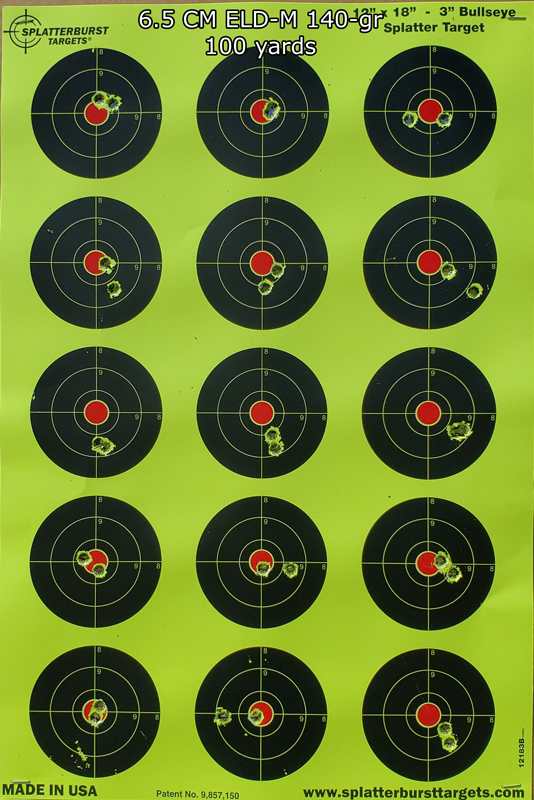
Edit to add (6/29/19) – Risking making this article too long, I’m going to add a real world example of using the “Virtual” or “Composite” group feature. I made it out to the range to give it a go. I used a “Shoot-n-C” target that has fifteen 3-inch bullseyes on it. I decided to shoot two rounds at each bullseye, for a total of 30 shots. If I had shot a single bullseye 30 times, it would be a ragged hole, making it impossible to track many of the shots. (I could have shot 3 rounds at each, if I wanted, to make it a 45-shot Virtual Group.)
Here’s the target image with no mark-up.
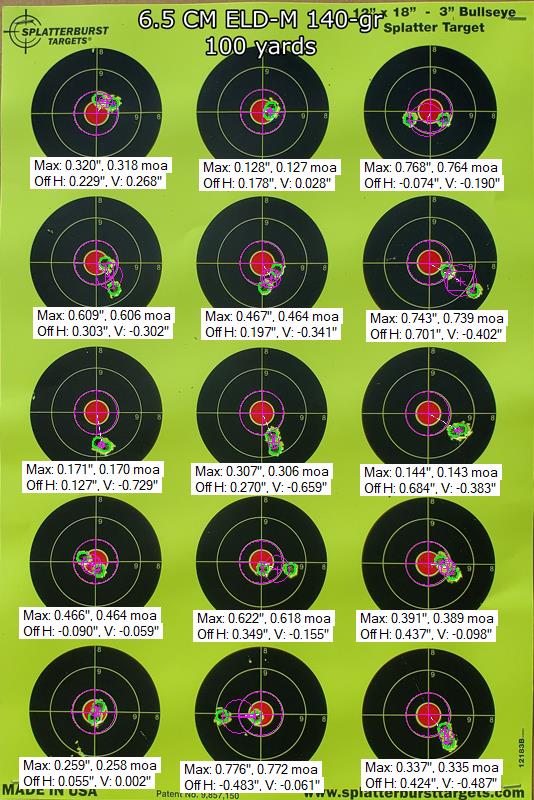
Here’s the same target with each group marked and measured with OnTarget TDS.
Then I click on the “Extended Target Data” button, and voila!
Dip your toes, or dive in!
Check out OnTarget. I think it’s a handy, perhaps essential, tool for precision shooters. You can use it for simply calculating your groups, or you can delve deeply into the data to figure out how to gain an extra edge in your performance. I think it’s the best program on the market, by far. Once you get past a small learning curve, you’ll be able to process your groups very efficiently… far more so than any phone app.
 Copyright protected by Digiprove © 2019 The Dental Warrior®
Everything explained and drawn. Excellent tutorial. Congratulations.
Without taking into account wind action, is it correct to say that MOA ajustment can be considered as a cone-shaped adjustment between the bullet’s exit and the center of the target?
Thanks a lot.
Sorry, I don’t think I understand the question. MOA is an angle measurement: Minute of Angle = 1/60th of 1-degree.
The precision of your shot groups can be measured in MOA by calculating the maximum spread (the two shots farthest apart) and the distance. This app makes it easy to do that.
Thanks Dental Warrior,
Appreciate your time and effort. Got a new LR hunting rifle and need this badly since I’m going past the 600 yd thresh hold (I hope). Your video convinced me this is a great tool. If you’re ever in Montana stop by and say Howdy (that is cowboy for hello, LOL)
Good to hear! Best of luck with the hunt! Thanks for the invite, too!
Still waiting for someone to do an online or Mac version. iOS versions are seriously cumbersome. And I don’t own a PC…so still waiting…