Who does THAT? Why would you?
I started my own practice renting space in an existing dental office (shared space). The other dentist took a lot of pride in his work, and deservedly so. One of the many things he felt strongly about was trimming his own crown and bridge dies. He had a stereo-microscope set up in his lab just for that purpose. So, I started doing it, too.
Eventually, I moved into my own office space, which happened to be next door. For many years, I continued to visit my friendly neighbors to borrow their microscope to trim my own dies…. and well… to socialize! Recently, I finally got my own microscope.
Why trim your own dies? This isn’t dental school!
I send my Impregum impressions to the lab to be poured and dies pinned and cut (but not trimmed). They return the models for me to trim the die margins.
I found that you learn a LOT about your preps and your impressions when you study your models / dies under a lab microscope. It’s very objective and different than observing them in the mouth. First, you can spin the die (prep) in any direction for viewing angles not possible in the mouth. Furthermore, as you trim the die, you can’t help but pay very close attention to your prep margin (and learn from it).
By the way, you can also use the lab microscope to inspect your impressions. The lighting is better than what you have intraorally. Also, the magnification is much higher. My lab scope goes up to 45x. That’s ten times higher than my Designs for Vision 4.5x surgical operating telescopes. Though 45x is well beyond the practical magnification for trimming a die. I find 7 – 10 X works well for general / gross trimming. I use up to 15X for fine tuning or trimming delicate concave areas like buccal furcations of a lower first molar or mesial concavity of an upper premolar.
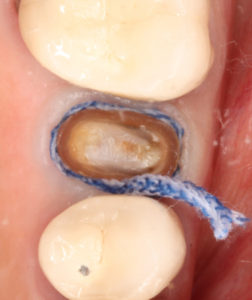
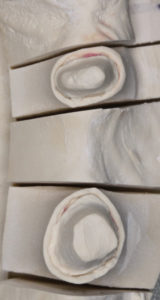
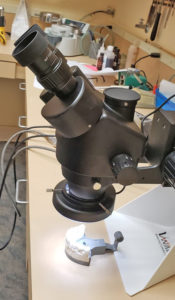
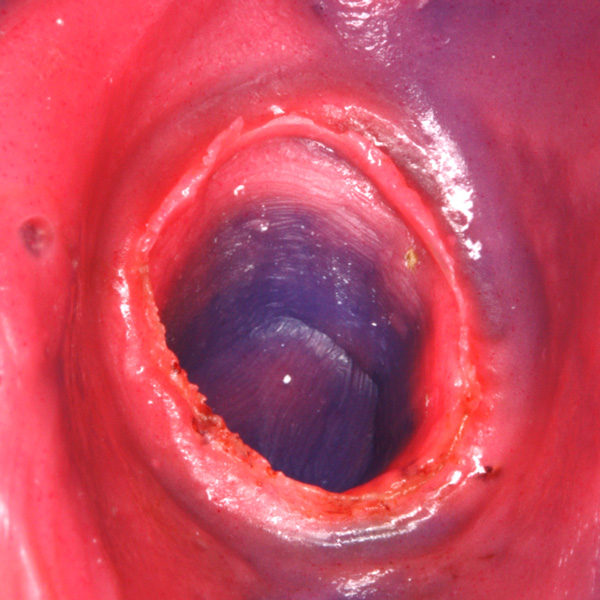
Untrimmed dies.
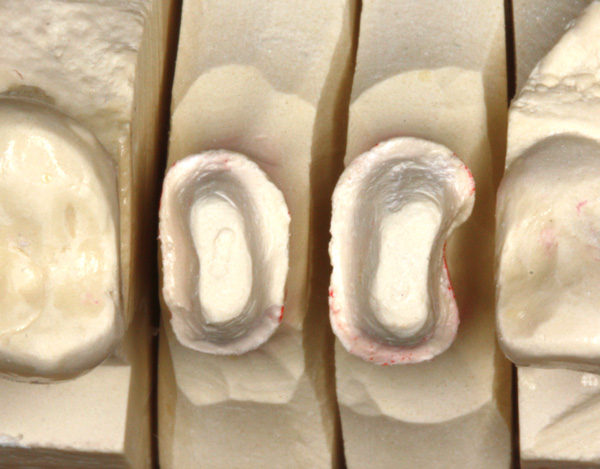
Holding the prepped “tooth” in your hand and inspecting it (while trimming the margin) under high magnification will make you acutely aware of any shortcomings and precipitate an effort to make your next prep and impression even better.
So, the first benefit is that by seeing your work in the form of a die under high magnification, you become a rather fussy “critic” of your own work. Accordingly, you can’t help but IMPROVE. Seeing your preps in the form of a die under a microscope is like listening to an audio recording of yourself. You sound different on the recording than when you sing in the car, right?
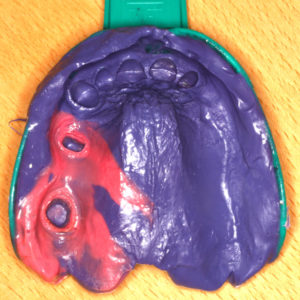
Nothing but the tooth, so help me G.V. Black.
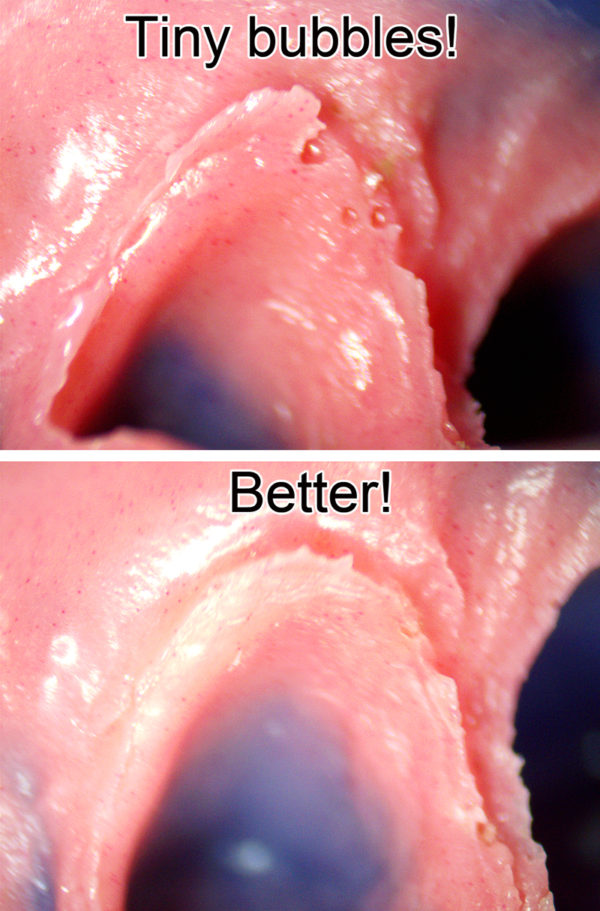
That margin you thought was smooth and contiguous when you prepped it…. maybe not so much when you look at the die under the microscope! If you think your preps are smooth after prepping with a coarse diamond, you’ll change your tune when you see the die at 10x or higher. The axial walls look like a grooved asphalt road! The axial-occlusal line angles are sharp rather than nicely rounded. Next thing you know, you’ll be ordering some fine diamonds to polish your preps!
That impression you thought captured the margins perfectly… maybe not so much. Next time you’ll spend a bit more time with tissue management, including gingival retraction and hemorrhage control. You might be more careful to not lift the tip of your wash material syringe, creating bubbles at the impression margin. It can be humbling! It’s an objective way to evaluate your work, much like reviewing photos of your cosmetic cases. Your lab will thank you!
Trimming Dental Dies with a Microscope Video:
If the crown doesn’t fit, you must not quit.
The other benefit is better fitting crowns. I believe that model work, including die trimming is generally delegated to the “low man on the totem pole” at commercial dental labs. (In the Navy we called that person, the “FNG!”) Over the years, I’ve had a number of cases where the margin was over-trimmed at the lab, resulting in a poor clinical margin. I don’t want the die trimming job delegated to the “FNG.” The margins are “kind of important!”
Of course, you have to send IMPECCABLE impressions with clear margins to the lab. I make every effort to send great impressions to the lab! Nevertheless, I find I get better results if I trim my own dies. Plus, I learn from each experience and strive to continuously improve.
The bottom line: Trimming my own dies has yielded better results… noticeably better. It’s been my routine for over 25 years. It started with just trimming the cases where I thought the margin might not be super-obvious. Now, I pretty much have all of them returned from the lab for die trimming. I’m still learning and still improving. Though, I’m quite certain that many dentists reading this will scoff at the idea! 🙂
Amscope Stereo Zoom Microscope Review
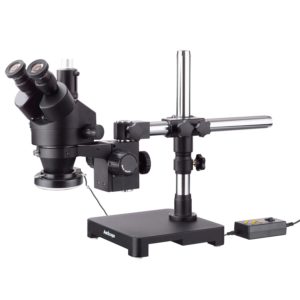
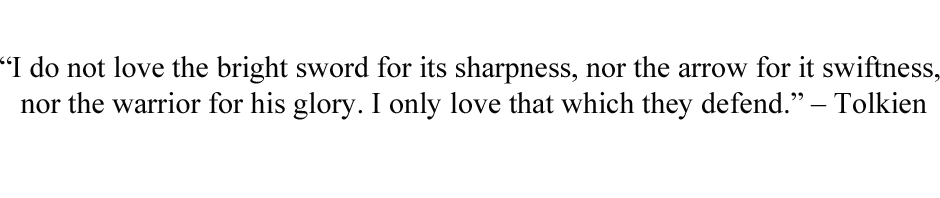
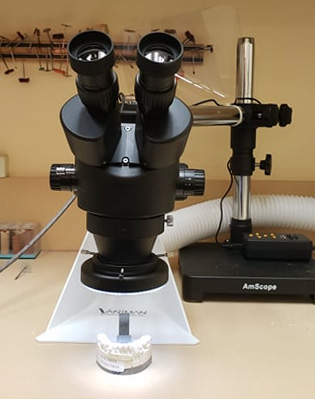
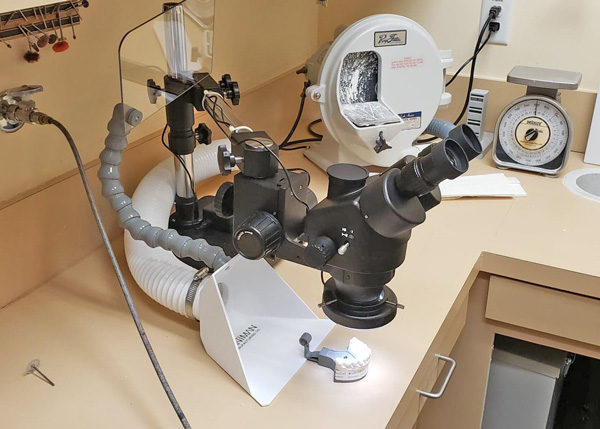
I delayed buying my own lab microscope for a couple of reasons. First, I had the convenience of being able to pop into the office next door to use their microscope. So, I simply never looked into it. I thought it would be fairly expensive. I was wrong about that. Recently, I did a search online and found Amscope. They sell all kinds of microscopes for various industries (including dental labs). The one I got retails for $577. Soup to nuts! It comes with everything you see in the picture! When I ordered, they had an online 10% off coupon code, making it about $520. Shipping was free! If I had known it was this inexpensive, I would have got my own lab microscope a long time ago!
To be specific, I got this model: 3.5X-45X Black Trinocular Stereo Zoom Microscope on Single Arm Boom Stand + 144 Direction Adjustable LED Ring Light (SKU: SM-3TX-144A-B). <—Link!
This kit includes everything you need. The “trinocular” means it has an additional viewing port to connect a camera.
Shouldn’t I get a famous brand scope?
I’m sure there are better high-end scopes out there. But, do I need a high-end microscope for my purposes? Honestly, I didn’t look beyond Amscope. But, I did wonder, “how good can it be for less than $600??” I was very pleasantly surprised. We’ll see how well it holds up. It comes with a 5-year warranty! My initial impression is very good.
- All mechanical components are made of metal.
- The optics are clear and sharp.
- The controls (focus and zoom) are smooth and have a good feel.
- The pivoting joints in the mount arms (which have locking screws) that allow for adjustable positioning of the scope are smooth and stable.
- The heavy base does not allow the unit to tip or wobble.
- The LED lighting is adjustable both in intensity and direction.
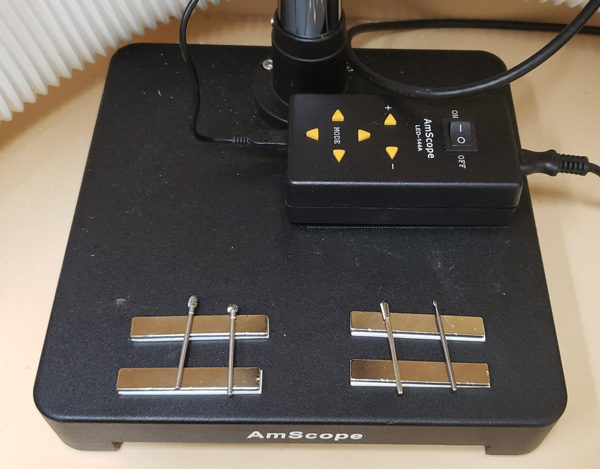
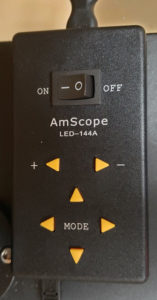
I’m glad I got the 144-LED light with adjustable intensity. On “full blast,” it’s too bright, especially at the lower magnification. I dim the light down quite a bit at the lower magnification to avoid eye fatigue. At higher magnification (light transmission is reduced – law of optics), you’ll need to increase the intensity of the light and can adjust it accordingly. A benefit of the ability to adjust the direction of the light is to intentionally cast a shadow to create contrast, making it easier to see the margin in the trickier spots. Omnidirectional light can wash out the more subtle demarcations and details. Get the adjustable light and play with it to see what works for you.
This scope has continuously variable zoom from 7x – 45x (or 3.5x – 22.5x, if you attach the included accessory 0.5x Barlow lens). The included accessory Barlow lens attaches to the scope objective lens and allows a wider field of view and increases the focal length / working distance from 4 inches to 8 inches. Either magnification range works for what we’re doing. For me, the system works better without the Barlow lens, because when the working distance doubles to 8 inches, it moves the scope too high for me to reach in a seated position (given my counter and chair height). When the working distance is at 4 inches (without the 0.5x Barlow lens), it’s perfect.
AmScope 144-LED Lighting Demonstration Video:

Microscope Mounting Options
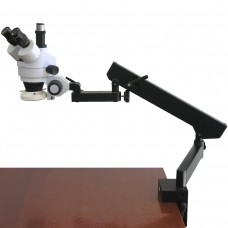
They offer various mounting options. I got the “single-arm boom” stand. (See photo up a few paragraphs.) The single-boom stand fits perfectly on my counter, is rock-solid, and weighs 30 pounds! The super-heavy duty double-arm mount would be too long to fit on my lab countertop. You can also get an articulating arm that clamps to a countertop, if that works better in your lab space (see photo to the right).
Bang for the buck, you just can’t beat this lab microscope. Honestly, I don’t know how they put together this high-value package for that price. In the spectrum of dental office equipment expenses, the investment falls at the very low end (if you get it from Amscope)! The “ROI” will be in the dividends that come from producing higher quality and more predictable dentistry along with increased professional satisfaction.
Editing to add: I’ve now had a chance to use the AmScope microscope several times, and I am so pleased! The image view is super-clear and sharp. At under $600, it really is a no-brainer to have in your lab. I also believe you’ll find other uses for it besides die trimming.
All the little details add up to big results.
I’m digging having my own lab scope, finally! And, I’m very happy with the quality of the Amscope brand microscope I got. If you’ve never scrutinized and trimmed your own dies under a lab microscope, you’re in for an “eye-opening” experience. I highly recommend it to those of you who are always looking to improve your results. I guarantee it will! Get your geek on with a lab microscope!
I expect that I’ll find other uses for the microscope, as well.
OK… maybe you’re thinking, “I’m not going to go out and get a microscope just to see what it’s like trimming my own dies!” If that’s the case, and you use a local lab, I will throw down this challenge: Go to your lab and ask if you can trim the dies from your last three cases on their microscope / bench. I bet they’ll let you do it. I PROMISE you, it will be an eye-opening experience.
(Don’t be surprised if you say to yourself, “Where the ***k is my margin?”)
What do you think? Chime in below with your comments!
PS… Get Your Lab Gear Fix with Vaniman!
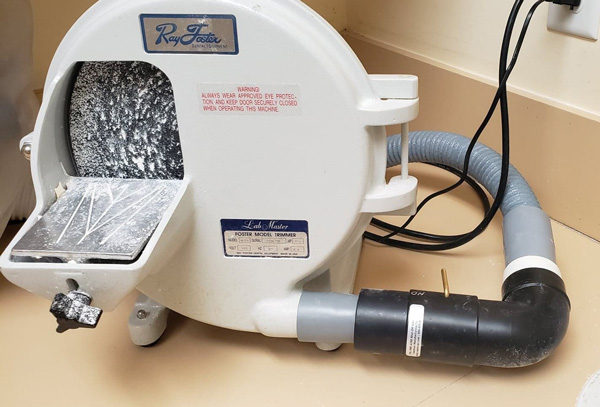
Who is Vaniman? From their website: ” Vaniman Manufacturing Company offers the latest technology in affordable micro-abrasive sandblasters, small dust collectors, and air filtration systems.”
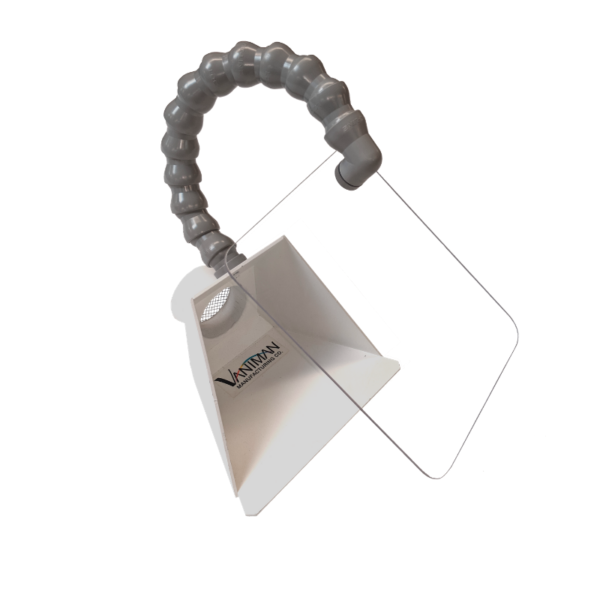
I can highly recommend Vaniman Manufacturing Company. They were a big help in getting my “fishmouth” benchtop dust collector (white thing you see on the counter), vacuum hoses, hose adapters, and shut-off valves for my new margin trimming station and existing dry model trimmer. Via emails with photos, the Vaniman rep did a fantastic job helping me set it all up. With both stations attached to the same vacuum, I wanted to be able to shut each station on / off individually, so I can have stronger vacuum at the station I’m using.
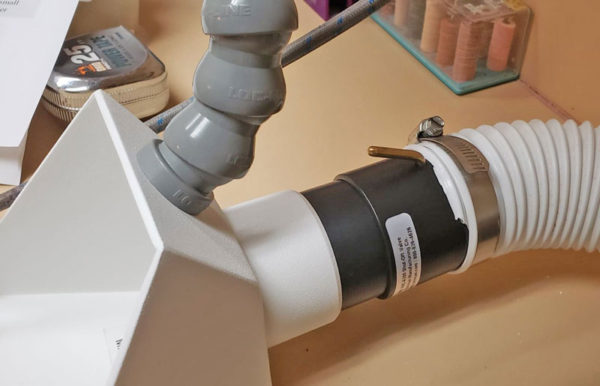
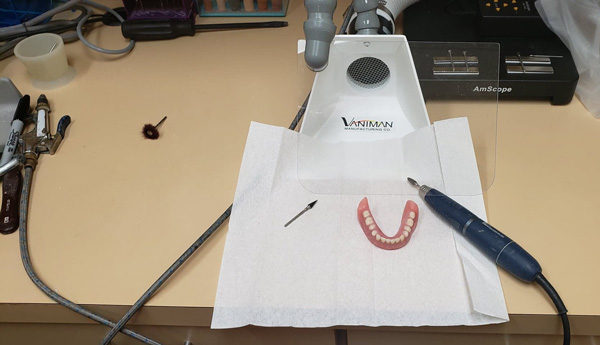
With the single-boom mount, I can easily pivot the microscope aside to trim and polish acrylic (dentures) or perform other non-magnified cutting and grinding tasks while using the fishmouth to suck the dust away. You don’t want to be breathing stone, metal, or acrylic dust. The “fishmouth” has an attached plexiglass shield mounted on a flexible arm that swings down for protection when grinding on dentures or other items.
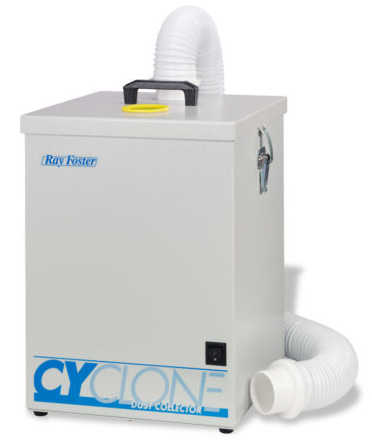
By the way, the fishmouth is connected to a dedicated lab vacuum / dust collector, NOT the clinical suction system. I have the Roy Foster “Cyclone” dust collector that fits inside the cabinet under the sink in my lab. Have an electrician put a switch on the wall over the lab counter, so you can turn it on / off without having to open the cabinet. The dust collector vacuum is also connected to a Roy Foster dry model trimmer. If you’re tired of the wet mess made by traditional wet model trimmers, you’ll LOVE a dry model trimmer!
 Copyright protected by Digiprove © 2019-2020 The Dental Warrior®
Hi Mike. There’s a bit of “old school” in you, just like me – and I dig that! Trimming your own dies does indeed allow you to improve the overall quality of your work. That’s why waxing and casting your own crowns or even setting some of your own denture cases,in school or in practice, helped to sharpen your clinical skills. It allowed you to understand the connection between clinical needs and lab limitations.
Can make you kind of humble, too. And that is the crux of a big problem in dentistry today: communication and relationship dynamics between doctors and their labs. I’m lucky enough to have fostered a fantastic relationship of 25 years with my lab. Our agreement is to pull no punches: if I ever send something that sucks, they are to call me immediately – nothing is “made to fly”. It’s either right or it’s not.
We sit down periodically and critique my stuff. They tell me one of their biggest issues is docs who are “always right” and get pissed when questioned. Then in fear of losing an account, acquiesce to the docs demands, putting the patient on the losing end. I say cut them loose, but sentiments and business are often at odds. As you, I learned the value of the clinical – lab connection and the resulting value of the doctor – lab relationship.
But today with these requirements being left out of education, and cost being a determining factor with choice of labs, along with the lack of forming strong, honest communication with a good local lab ( and don’t even get me started on these overseas labs), these issues fester. “Old school” isn’t sexy, but there was and is great wisdom to be learned from it’s application. Thanks for spotlighting it today.
Hi Brian! Great comment!
Yep… I’m a proud “analog dentist.” There is a lot to be said for “old school, done right.”
I have the same agreement with my labs as you. If my impression isn’t good enough, send it back and tell me! I’ll re-do it. I will say that pretty much never happens, because I do my best to reject a less-than-ideal impression BEFORE it goes to the lab (by making another one). But, yeah… they’ve told me that most dentists just tell them, “make it work.” When you’re doing crowns at half-fee for HMOs / PPOs, you can’t afford to have any “do-overs.” So, you make ALL of it “work.”
In dental school, we had to do ALL of our own lab work, and I do mean ALL of it. We even stacked our own porcelain. We learned a lot from that.
Thanks for chiming in! I expect this notion of trimming your own dies will fall mostly on deaf ears. But, I had to put it out there, anyway. 😀 The benefits of doing this simple task are tremendous. They really are.
Hey Mike, that is how I got into using magnification in clinical dentistry 30+ years ago. When I got out of dental school, I built my own lab in my basement and started making my own crowns. Of course I had a scope for trimming dies. I remember the first crown I tried to make in my lab. I was so excited! I had tried so hard clinically to do a great prep, but I did not use any clinical magnification then. I remember looking at that first prep that I thought was so great under the lab scope. I was shocked at how piss poor it was! I had to reappoint the pt to reprep the tooth. From then on, I always used clinical magnification (3.5X or above). I even used a clinical microscope for 10+ years.
Hey, Arturo! Well, I’ve seen your dentistry in person (patients in common), so I know what a quality guy you are! 🙂
I’m up to 4.5x with my new Designs for Vision clinical scopes. I’ve been using clinical scopes for probably 25 years.
I’m sure the microscope operators will chime in here, eventually! LOL! I get it. But, to install operating microscopes in the operatories is a whole other level of commitment. MUCH more money. And, it requires a whole new way of operating. I’ve used an operating microscope in a CE course. I liked it, of course. But, we’re talking 5 figures and changing pretty much everything I do in the op. Maybe some day. I’m not ruling it out. But, I’m just not “there,” yet. 🙂
Thanks for reading my article and commenting, Arturo!