

After nearly 25 years in Dentistry, I’ve learned that “herodontics” is often an exercise in futility. But, one of the things I love about being a dentist is the creative problem-solving aspect. My assistant has called me “McGyver” for many years.
Today’s patient is a 28 y.o. woman. She has a number of problems stemming from neglect and procrastination. Money is not an issue. She came to my office for a comprehensive examination and treatment plan. Her top priority was a tooth (#5) that was “broken.” Her biggest concern was that she’d end up with a “hole in her smile.” Case photos and technique after the jump…
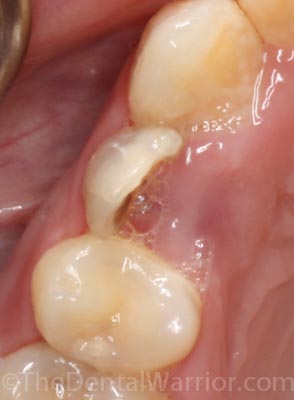
Where did the tooth (#5) go?
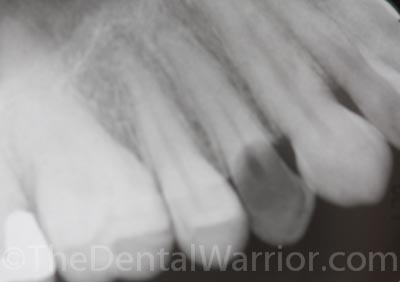
Tooth #5 was severely compromised. The only thing left standing was the wisp of a facial cusp. Treatment options included extraction and an implant vs. saving the tooth. She preferred to save it, if possible. The question was: Is it possible? Is it savable? The x-ray images were not conclusive in that regard. Well, I’m sure some would argue that the tooth is unrestorable based on the x-ray alone. The only way to be sure was to get a good look at it by cleaning it up. She was OK with an “exploratory” approach.
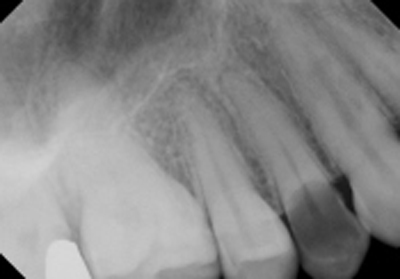
Pre-op x-ray from previous dentist.
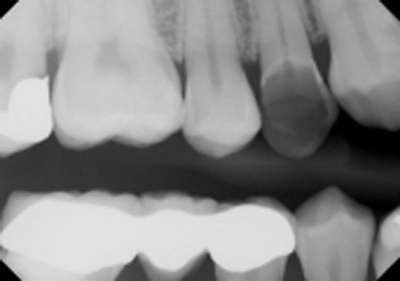
Pre-op BWX from previous dentist.
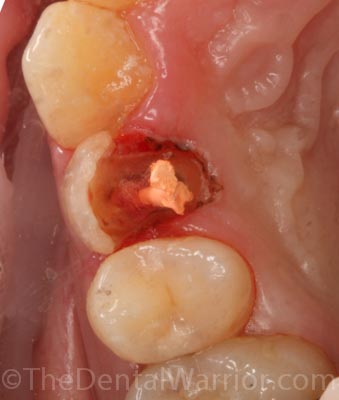
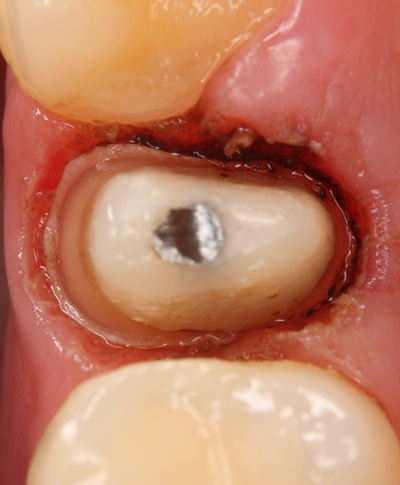
I placed an Optragate retractor for easy access and limited isolation. I used a diode laser (Picasso Lite) to clean up the hyperplastic tissue on the palatal side. I was surprised to find fairly solid tooth structure hiding under there. The pulp was exposed without me even touching the tooth. But surprisingly, it was still vital! At this point, I explained to the patient that I thought we could save the tooth, while I could not guarantee any long-term results. She was fine with that.
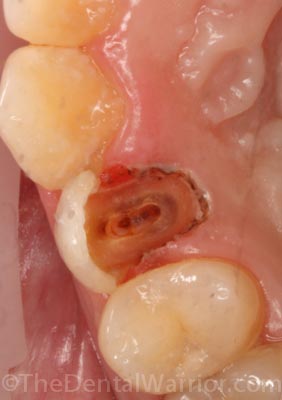
Tooth is exposed and cleaned up.
This x-ray was taken after I cleaned things up.
I cleaned up the tooth and the canal orifices. There was no way to clamp the tooth for a rubber dam. So, it was “McGyver time!” With the Optragate still in place, I did some initial instrumentation and shaping of the canals. (Edit: I did that using ONLY rotary files connected to a handpiece.) Then I temporarily placed a couple of gutta percha points in the canals and filled the rest of the “chamber” with cotton. This was followed by placing a core build-up around the gutta percha.
Two gutta percha points temporarily placed in the canals.
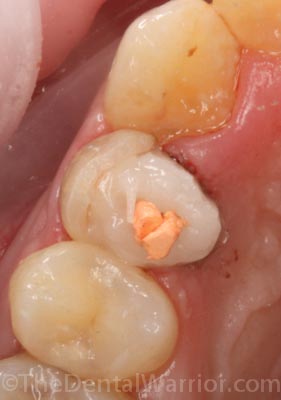
Core build-up placed around the gutta percha.
Now I could place a rubber dam and have the canal system isolated from any contamination. I removed the gutta percha and cotton and had perfect access to the canals.
Now I can place a rubber dam and proceed with endodontic treatment!
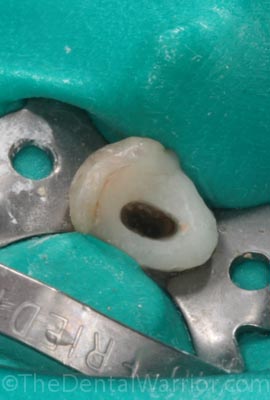
Rubber dam placed and easy access to canals!
I got as far as instrumenting to the apex with hand files to a #20 file. At this point, the patient had enough, and I was pretty tired, myself! I dried the canals, placed a dry cotton pellet and Cavit temp. My patient was happy to get a break and made an appointment to continue treatment.
And, that’s how I spent my morning! 🙂 Now… should I grow a “mullet?”
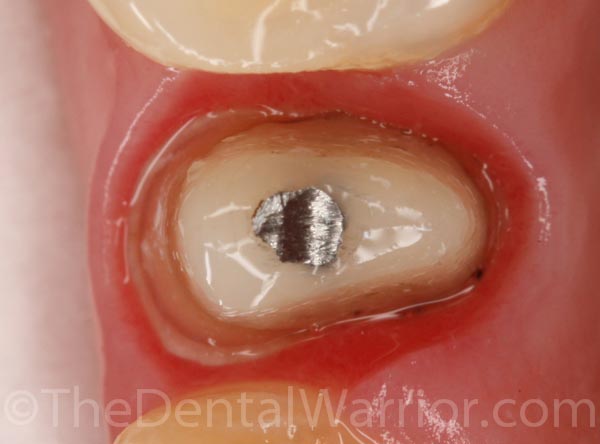
Update: Here is a pic of the prep. (Sorry the image isn’t well-focused.)
UPDATE #2: Here’s a pic of the prep the day we delivered the crown.
I’ll post a post-op photo of the final restoration when I see the patient back. Oh… by the way, this is the case I was working on (finishing the endo) while I was being filmed by CNBC for their one-hour special on the AR-15.
 Copyright protected by Digiprove © 2013 The Dental Warrior®
I would have to agree with your assistant! MacGyer!! Great job Mike!
You r crazy!
LOL! Thank you, master of the obvious!
Nicely done. I would’ve given my inner MacGyver the day off and sent her off for the implant. But hey, if it works……
Great photos and documentation for this case. Definitely herodontics. In your other posts you mention that you don’t charge for simple troughing. Most dentists I know don’t either if they use the laser to facilitate a better impression. Did you charge out for the use of the laser in this case? If so did you use the gingivectomy code?
Hi Nicholas! Thanks for checking in and for your comments.
In this case, I charged for an “exploratory” procedure (which assumed / included the gingivectomy)… I made up a code for it. I don’t have to worry much about which “code” I use, since so few of my patients have any benefit plan (“insurance”).
Nice work. love the GP to help with the initial buildup. So this gets crown lengthening and a crown?
Hi Daniel! Don’t know about crown lengthening, yet. Will sound to bone at next visit to determine biologic width.
Nice job Mike. From my experience, I can never get enough of a ferrule around the tooth. The patient usually ends up back at my office with the crown off and the build up left inside. I have learned to punt these immediately. Good luck 🙂
Hi Cole. Yeah… I’d like beautiful ferrule 360-degrees around the tooth, too. However, some patients really want to keep their tooth if at all possible. Is it a success or failure if it lasts 5 years? 10 years? 15 years? More? This patient knows that this is a “Hail Mary.”
Just in case you’re subscribed to this post, Cole…
I’ve updated it to include a photo of the prep.
I can’t believe no one has encouraged you to grow the mullet!
Really smart by putting the GP points in first before building up the composite!
I was just wondering how did you restore it after the root canal was completed? I have a similar case and was wondering what was the best long term solution for it. Thanks!
Hi Lily,
I later did a post / core and prepped for a crown. It’s still in a provisional while we do some other restorative. Will take final impression of everything at once. Once I finish, I’ll post some final photos and films here.
Thanks for your comments!
sir this is upper 1st premolar not second
Hi Dr. Ashu,
Of course, you are quite correct. But, I never called it a 2nd premolar. I did, however, properly call it #5.
I suspect you are not in the U.S.
Here in the U.S. this is tooth #5. We use #’s 1 – 32. #1 is upper right 3rd molar and that goes around to #16 as the upper left 3rd molar. Then we drop down to #17 (the lower left 3rd molar) and work our way around to #32 (the lower right 3rd molar).
Yep… we are the only crazy country to use this numbering system. 🙂 The funny part is that it’s called the “universal” tooth numbering system. But, we’re the only ones who use it.
If I’m not mistaken, this would be a #1-4 in the rest of the world.
Thanks for reading and commenting. I hope you’ll find the blog interesting!
Long-time follower, first time commenter. Just curious about the post/buildup combo you used here… and how is this holding up one year later?
-JJ
Hi Jordan,
Thanks for commenting on my blog. This restoration is still going strong. I’ll see if I can get an x-ray and photo of it at her next recall.